
how the 12v system works
The Tesla Model Y uses a small 12V battery to run the lights, windows, and computer systems. While the large traction battery moves the car, this smaller unit powers the Body Control Module (BCM). If it dies, you can't start the car or even unlock the doors. It is a common failure point that often catches owners off guard.
Symptoms of a failing 12V battery can be subtle at first. You might notice slow window operation, issues with the key fob not working consistently, or difficulty waking the car from sentry mode. More seriously, the car might refuse to unlock or start. What’s been happening recently is a notable increase in reported failures, even in relatively new vehicles. There’s been quite a bit of discussion online about this, with some owners attributing it to the battery’s size or design, but the exact cause isn’t fully understood.
I want to be upfront about something: this isn’t a perfect system. Tesla seems to be using a smaller 12V battery than some other manufacturers, and its placement and charging strategy have come under scrutiny. It’s a somewhat controversial topic because of the frequency of failures and the inconvenience it causes owners. It’s a relatively inexpensive part, but the impact of its failure can be significant, and the need for replacement is becoming more common.
The 12V battery in the Model Y is a standard lead-acid battery, although lithium-ion replacements are becoming available. It’s not a huge battery – typically around 70Ah – but it plays a disproportionately large role in the car's overall functionality. Understanding this will help you recognize potential issues and decide whether a DIY replacement or professional service is the right choice for you.
tools for the job
If you're comfortable working on cars and have some basic mechanical skills, replacing the 12V battery in your Model Y is a job you can tackle yourself. However, it’s not a simple process, and safety should be your top priority. You’ll need a few specific tools to get the job done right. These include a 10mm socket, a T20 Torx bit, a set of plastic trim removal tools (essential for avoiding damage to interior panels), and gloves to protect your hands.
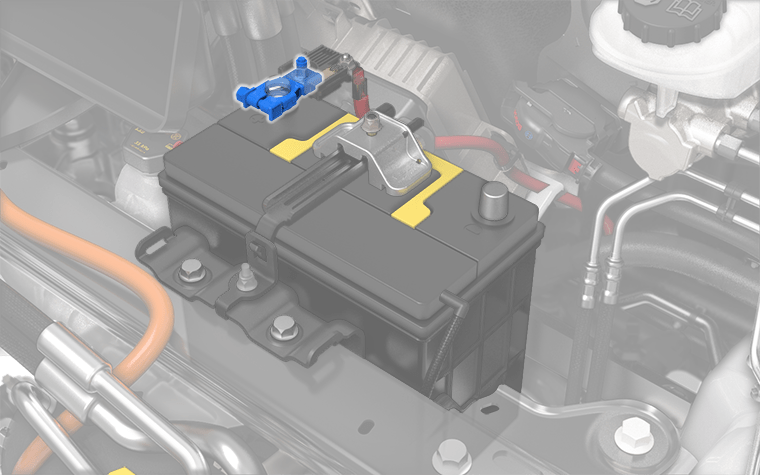
Before you even think about disconnecting anything, always disconnect the negative terminal of the 12V battery first. This is a fundamental safety precaution to prevent short circuits. Once disconnected, it’s crucial to wait at least 15-20 minutes to allow the system to fully discharge. This is because the car’s computers may still be holding a residual charge. Failing to wait could lead to electrical shocks or damage to the vehicle’s electronics.
The battery is under the front hood, beneath the plastic maintenance panel near the windshield. You have to pop the clips on the apron to reach it. It's a tight squeeze, so using plastic pry tools helps avoid snapping the tabs. I'd suggest looking at a photo of the clip locations before you start pulling on the plastic.
Ensure you have a suitable replacement battery on hand before starting. Check the specifications (Ah rating, dimensions) to ensure it’s a compatible replacement. Also, have a plan for properly disposing of the old battery – most auto parts stores will accept them for recycling. Finally, clear a well-lit, clean workspace and gather all your tools. Being organized will make the process much smoother.
DIY: The Replacement Process
With everything prepared, you can begin the actual battery replacement. After waiting the necessary time for discharge, carefully disconnect the negative terminal, followed by the positive terminal. Take photos of the wiring connections before disconnecting them – this will be incredibly helpful when reconnecting the new battery. Once the old battery is disconnected, remove it from the tray. It might be held in place by a bracket or strap.
Before installing the new battery, inspect the battery terminals and cable connectors for corrosion. Clean them thoroughly with a wire brush or terminal cleaner if necessary. Corrosion can impede the flow of electricity and cause problems down the road. Carefully position the new battery in the tray and secure it with the bracket or strap. Then, reconnect the positive terminal first, followed by the negative terminal. Ensure the connections are tight and secure.
The potential for error is relatively high during this process, so double-check all your connections before proceeding. A short circuit could damage the car’s electrical system. After reconnecting the battery, the car may not immediately recognize the new battery. You might need to leave the car on and let it sit for a few minutes to allow the BMS to calibrate. Some owners have reported needing to perform a BMS reset, which requires using a diagnostic tool.
Proper disposal of the old battery is essential. Lead-acid batteries contain hazardous materials and should not be thrown in the trash. Most auto parts stores, like AutoZone or Batteries Plus Bulbs, offer free battery recycling services. They’ll safely dispose of the old battery and ensure it doesn’t harm the environment. Even with careful instructions, mistakes can happen, so don't hesitate to seek professional help if you're unsure about any step.
- Pull the negative terminal first to prevent shorts.
- Disconnect the positive terminal.
- Remove the old battery.
- Clean the terminals.
- Install the new battery.
- Reconnect the positive terminal.
- Reconnect the negative terminal.
Professional Installation: What to Expect
If you’re not comfortable with a DIY replacement, or if you simply prefer the peace of mind, professional installation is a great option. A qualified Tesla technician or service center will have the expertise and tools to replace the battery quickly and correctly. The process typically involves a diagnostic check to confirm the battery is the issue, removal of the old battery, installation of the new battery, and a system check to ensure everything is functioning properly.
The benefits of professional installation include speed, expertise, and a warranty on the parts and labor. You can avoid the hassle of sourcing the battery yourself and the risk of making a mistake during the installation. Finding a qualified technician is relatively straightforward – you can schedule an appointment at a Tesla Service Center or find an independent mechanic specializing in electric vehicles.
As of late 2026, I’m seeing quotes ranging from $200 to $400 for professional installation, but this price can vary depending on your location and the specific service center. It's always a good idea to get quotes from multiple shops before making a decision. Be sure to ask what type of battery they are using (OEM or aftermarket) and what warranty is included.
When you go for professional installation, they will also be able to perform any necessary BMS resets or recalibrations to ensure optimal performance of the new battery. They can also inspect other components for potential issues and provide recommendations for preventative maintenance.
Tesla Model Y 12V Battery Replacement: DIY vs. Professional Installation - Decision Matrix (2026)
| Factor | DIY Installation | Professional Installation |
|---|---|---|
| Cost | Low | Medium to High |
| Time Required | Medium | Low |
| Skill Level Required | Medium to High | Low |
| Warranty | None (unless battery defect) | Medium (parts & labor typically covered) |
| Risk of Damage to Vehicle | Medium | Low |
| Convenience | Low | High |
| Tools Required | Medium | Low |
| Potential for Complications | Medium | Low |
Illustrative comparison based on the article research brief. Verify current pricing, limits, and product details in the official docs before relying on it.
tesla oem vs. aftermarket batteries
When it comes to replacing your Model Y’s 12V battery, you have two main options: OEM (Original Equipment Manufacturer) batteries from Tesla and aftermarket batteries from third-party manufacturers. OEM batteries are the same ones that came with your car originally, and they offer guaranteed compatibility and quality. However, they are typically more expensive than aftermarket options.
Aftermarket batteries can be significantly cheaper, but the quality and lifespan can vary greatly. Some reputable aftermarket brands offer batteries that meet or exceed OEM specifications, while others are of questionable quality. It’s crucial to do your research and choose a brand with a good reputation and a solid warranty. I’ve heard mixed reviews on some of the cheaper aftermarket batteries, with some owners reporting shorter lifespans or compatibility issues.
Battery specifications are important to consider. The OEM battery for the Model Y is typically a 70Ah AGM (Absorbent Glass Mat) lead-acid battery. Aftermarket options are available in various Ah ratings, but it’s generally best to stick with the OEM specification to ensure compatibility. Voltage should always be 12V, and dimensions should be similar to the original battery to ensure it fits properly in the tray.
Here's a quick comparison: OEM batteries offer peace of mind and guaranteed compatibility, but at a higher price. Aftermarket batteries can save you money, but require careful research to ensure quality and reliability. Consider your budget, your comfort level with risk, and the importance of long-term reliability when making your decision.
Featured Products

12 Volt 11 Amp Hour · 210 Cold Cranking Amps (CCA) · Sealed Lead Acid (SLA) Absorbed Glass Mat (AGM) technology
This highly-rated 12V AGM battery offers reliable power and longevity, suitable for both DIY enthusiasts and professional installations for your Tesla Model Y.

12 Volt · 750 Cold Cranking Amps (CCA) · Dual purpose (starting and deep cycle)
This highly-rated 12V AGM battery offers reliable power and longevity, suitable for both DIY enthusiasts and professional installations for your Tesla Model Y.

12 Volt · 1500 Cranking Amps (CA) · AGM technology
This highly-rated 12V AGM battery offers reliable power and longevity, suitable for both DIY enthusiasts and professional installations for your Tesla Model Y.

12 Volt 8 Amp Hour · Sealed Lead Acid (SLA) Absorbed Glass Mat (AGM) technology · F1 terminal type
This highly-rated 12V AGM battery offers reliable power and longevity, suitable for both DIY enthusiasts and professional installations for your Tesla Model Y.

12 Volt 75 Amp Hour · Sealed Lead Acid (SLA) technology · High cycle life
This highly-rated 12V AGM battery offers reliable power and longevity, suitable for both DIY enthusiasts and professional installations for your Tesla Model Y.
As an Amazon Associate I earn from qualifying purchases. Prices may vary.
Troubleshooting: Common Issues After Replacement
Even with a successful battery replacement, you might encounter some issues. One common problem is the car not recognizing the new battery. This can happen if the BMS hasn’t had a chance to calibrate to the new battery’s characteristics. Leaving the car on for a period of time, or driving it for a short distance, can often resolve this issue.
Another issue is BMS errors appearing on the infotainment screen. These errors can indicate a problem with the battery’s charging or communication with the BMS. Try disconnecting and reconnecting the battery terminals to reset the BMS. If the errors persist, you may need to have the car diagnosed by a professional technician.
Some owners have reported continued symptoms, such as slow window operation or key fob issues, even after replacing the battery. This could indicate a problem with other components in the car’s electrical system, such as the BCM or wiring harness. A thorough diagnostic check is necessary to identify the root cause.
I've seen reports of people needing to have the car 're-learned' to the new battery using specialized diagnostic equipment. This process essentially tells the car’s computer about the new battery’s capacity and characteristics. If you’re experiencing persistent issues, don’t hesitate to seek professional help from a qualified Tesla technician.


No comments yet. Be the first to share your thoughts!